Video Phone Grandstream GXV 3000VoIP Configuration
The Grandstream GXV-3000 Video Phone features an adjustable advanced VGA resolution camera sensor (with 1-touch ON/OFF switch for privacy control), a razor-thin 5"6-inch TFT color LCD with stunning picture quality (2-dimensionally rotatable to allow nearly all viewing angles), 5 navigation keys, 3 line indicators (each of which supports independent SIP account), visual voice/video message indicator, hands-free speakerphone with advanced acoustic echo cancellation, dual 10M/100M Ethernet ports (switch or router mode configurable), 2 USB ports, 2.5mm headset jack, and RCA style audio/video output jack to allow simultaneous video output to TV.
STEP 1
You must first determine what IP address it received.
By default, you will see this address on the LCD screen of the video phone.
STEP 2
Go to any browser equipped computer on your network and enter the address: http://<IP ADDRESS>/
<IP ADDRESS> is replaced by the address that was given to you in STEP 1.
STEP 3
You will be prompted to enter a password, the default is "admin", then cliche "Line 1" tab.
STEP 4
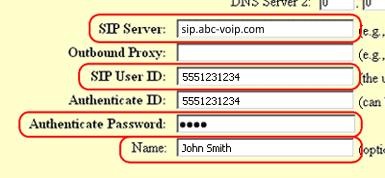
Go to ACCOUNT 1 tab. You need to modify only a few parameters from the factory default. They are listed here:
SIP Server: sip.ABC-VoIP.com
SIP User ID: Enter the account number assigned to you when signed up for ABC-VoIP service.
Authenticate ID:Enter the account number assigned to you when signed up for ABC-VoIP service.
Authenticate Password: Enter the password that you chose when you signed up for the service.
Name: Enter your full name, this will show up as part of your caller ID.

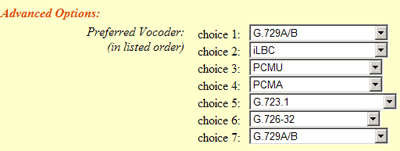
Advanced Options choice 1: Change preferred Vocoder to G.729A/B

SIP Registration: Yes

NAT Traversal: No

STEP 5
Click on the "Update" button at the bottom of the form.

STEP 6
Go to ADVANCED SETTINGS tab.Click on the "Update" button at the bottom of the form.
STEP 7
Click on the "Update" button at the bottom of the form.

STEP 8
You will be brought to a confirmation screen on which you will click on the only option available: "Click to view your changes".
STEP 9
Click on the "Reboot" button at the bottom of the form.

STEP 10
Make Calls!
Problems?
If you get one-way audio, or cannot get a dial tone or cannot make/receive calls with your VoIP device, you are probably behind firewall. Your router's firewall (also known as NAT) is blocking certain operations of the VoIP telephone adapter or some of the settings of the adapter is not entered correctly.
